Minesweeper - A Refactoring Exercise
First explorations of Spectre.Console while refactoring a console version of Minesweeper.
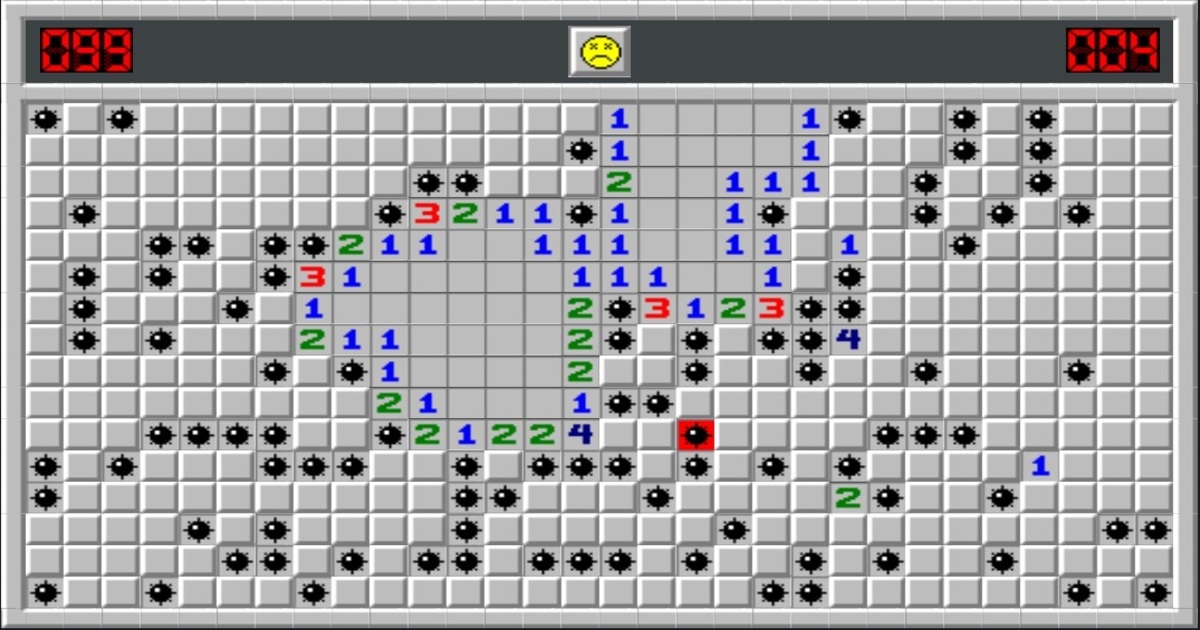
I was browsing GitHub a couple months ago when I came across a basic version of console Minesweeper. It gave me flashblacks of attempting to play it as a teenager and always hitting bombs. I never understood the game back then, but that was because I’d never read the rules. In any case, it seemed quite boring at the time when compared to games which contained beautifully rendered graphics, movable characters, and titillating sounds.
After reading the rules (which turned out to be rather simple), I downloaded and built the code for the console project. On my first run of the game I was able to win my very first game of Minesweeper.
 Playing the console game
After that I found a few sites online, played a few games, and for a short period of time became hooked on Minesweeper. I thoroughly enjoyed working out where the bombs were and discovering the patterns.
Looking at the code for the game I’d downloaded, I saw that there were roughly 460 lines all contained in the Program.cs file. I thought that it would be a fun exercise to improve the game by refactoring the code. I also decided that this would be a good time to try out the Spectre.Console library in order to add some graphical improvements. The remainder of this post will be a general description of that process.
Creating the Models
The first step in the refactor was evacuating the code from Program.cs into an Engine class. Doing this significantly reduced the lines of executable code in Program.cs:
1
2
3
4
5
6
7
8
9
10
namespace MineSweeper;

public class Program
{
    static void Main(string[] args)
    {
        Engine minesweeperEngine = new Engine();
        minesweeperEngine.Run();
    }
}
Program.cs went from 460+ lines of code to approximately 10 lines. Further analysis of the code then revealed that the game board and its cell contents could be modeled separately in their own classes called Board and BoardElement respectively. Using the Spectre.Console library in order to have colour graphics and basic menu functionality resulted in the creation of the Display, Menu, and MenuOption classes.
So I ended up with a total of six new classes:
- BoardElement
- Board
- MenuOption
- Menu
- Display
- Engine
Surveying the Classes
In this section I give an overview of each of the aforementioned classes and their usage. Methods and other class members which aren’t needed to understand the big picture are omitted from the sample code. Please refer to the github repo if you want to review all of the project code.
BoardElement
For the purposes of facilitating gameplay, the cells on the board can be classified as:
- hidden
- empty
- containing a bomb
- containing an unknown element
Each cell classification is assigned a character when a BoardElement object is instantiated. These characters are then used when displaying the board. Default character values are assigned via a parameterless constructor, or can be specified via a parameterized constructor as shown in the code below.
1
2
3
4
5
6
7
8
9
10
11
12
13
14
15
16
17
18
19
20
21
22
23
24
25
26
27
28
29
30
31
32
33
34
35
public class BoardElement
{
    private string cellBomb;
    private string cellEmpty;
    private string cellUnknown;
    private string cellBorder;

    // Properties
    public char CellBomb{...}

    public string VisibleCellBomb{...}

    public string HiddenCell{...}

    public char EmptyCell{...}

    public char UnknownCell{...}

    // Constructors
    public BoardElement()
    {
      cellBomb = "*";
      cellEmpty = " ";
      cellUnknown = "?";
      cellBorder = "|";
    }

    public BoardElement(char bombChar, char cellBorderChar, char hiddenCellChar)
    {
      cellBomb = bombChar.ToString();
      cellBorder = cellBorderChar.ToString();
      cellUnknown = hiddenCellChar.ToString();
      cellEmpty = " ";
    }
}
The class properties are used to return variations on the different cell types which are then used in comparison tests by some of the methods in the Board class.
Board
The Board class is where all of the data related to gameboard and player choices is stored, and where all of the changes to the gameboard are done.
1
2
3
4
5
6
7
8
9
10
11
12
13
14
15
16
17
18
19
20
21
22
23
public class Board
{
    BoardElement boardElement;

    // Properties
    public int BombCount{...}

    public int BoardDimensions{...}

    public bool[,] ChoiceBoard{...}

    public char[,] PlayerBoard{...}

    // Public methods
    public Board(GameLevel gameLevel){...}

    public string[,] ExportGameBoard(GameStatus gameStatus){...}

    public void UpdateBoard((int x, int y) inputCell){...}

    public void ResetBoard(GameLevel gameLevel){...}

}
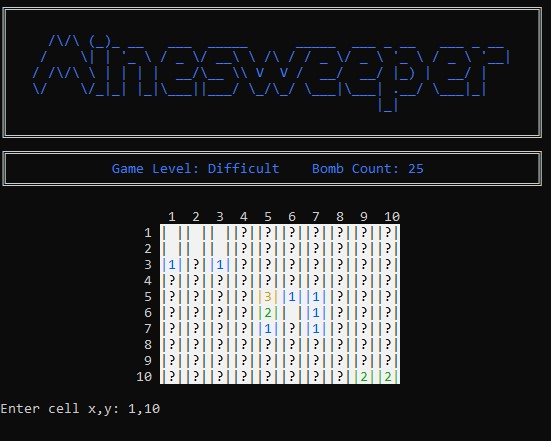
The constructor for the Board class takes a parameter which is used to determine the size of the gameboard and number of bombs which will be placed. The three game levels of beginner, normal, and difficult correspond to board sizes of 5x5, 8x8, and 10x10 respectively.
The ExportGameBoard method returns a string array containing a version of the gameboard based on the game’s current status. If the game is still in progress, the cells which haven’t been selected by the player remain hidden. If the game has been won or lost, all cells and their contents are returned as is with nothing hidden. This string array is used in the method ShowGameBoard in the Display class to display a colorized version of the gameboard.
The UpdateBoard method updates the cell in the choice board specified by the parameter to the value true provided that it isn’t a bomb. This is a key method which is used to advance the game after each cell selection.
The ResetBoard method does what its name says - it resets the gameboard to the initial state, and does this based on the game level specified. This is used when the game reaches the game over state.
MenuOption
The MenuOption class stores the data associated with one menu item.
1
2
3
4
5
6
7
8
9
10
11
public class MenuOption
{
    public string OptionName { get; set; }
    public int OptionValue { get; set; }

    public MenuOption(string name, int value)
    {
        OptionName = name;
        OptionValue = value;
    }
}
The OptionValue property stores the position of the menu item in the menu. So for example, if the menu item is second in the list, then its OptionValue will be 1. The OptionValue property is assigned using a zero-based index when the menus for the game are created in the Display class.
Menu
The Menu class is composed of a list of MenuOption objects, and is used to display the menu options and retrieve the player’s selection.
1
2
3
4
5
6
7
8
9
10
11
12
13
14
15
16
17
18
19
20
21
22
23
24
25
26
27
28
29
30
31
public class Menu
{
    private List<MenuOption> optionsList;
    public string MenuPrompt{ get; set;}

    public Menu(MenuOption[] options)
    {
        optionsList = new List<MenuOption>();

        foreach (MenuOption option in options)
        {
            optionsList.Add(option);
        }
    }

    public int ShowMenu()
    {
        var menuOptions = GetNamesArray();
        var menu = AnsiConsole.Prompt(new SelectionPrompt<string>()
                           .Title(MenuPrompt)
                           .PageSize(5)
                           .AddChoices(menuOptions));

        return GetOptionValue(menu);
    }

    public int GetOptionValue(string selectedOption){...}

    private string[] GetNamesArray(){...}
}
The GetNamesArray method builds an array of string from the list of MenuOption objects by extracting the value of OptionName property from each object.
The GetOptionValue method returns the OptionValue property of the selected item based on the selected menu option’s name.
The MenuPrompt property is used to specify the text prompt which will be displayed to the user along with the list of menu options.
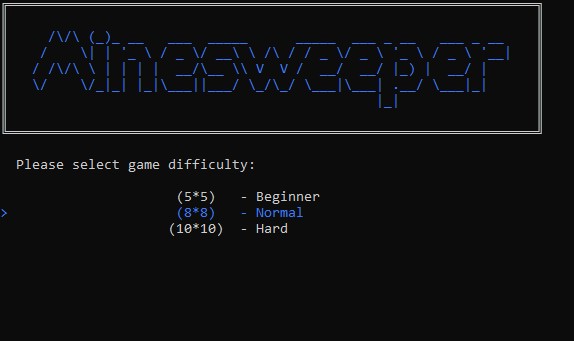 Level selection menu
The ShowMenu method uses the list of MenuOption objects, converted to a string array using the method GetNamesArray, to display a text menu using the Spectre.Console method AnsiConsole.Prompt which returns the option selected as string. This little gem of a method makes it easy to display, select, and retrieve player selections using as little as two lines of code. (This is assuming that the entire call to AnsiConsole.Prompt is written on one line, unlike my call which is split across four lines.)
Display
The Display class manages all of the graphical output for the game. It handles the display of the game title, menus, game board, and game over panels.
1
2
3
4
5
6
7
8
9
10
11
12
13
14
15
16
17
18
19
20
21
22
public class Display
{
    Menu mainMenu;
    Menu gameLevelMenu;
    Menu restartMenu;
    BoardElement boardElement;

    public Display(){...}

    public void ShowGameDisplay(Board gameBoard, GameLevel gameLevel, GameStatus gameStatus,
                                bool showGameResult){...}

    public MainMenuOption ShowMainMenuWithTitle(){...}

    public RestartMenuOption ShowRestartMenuWithTitle(){...}

    public GameLevel ShowLevelMenuWithTitle(){...}

    public void ShowGameBoard(Board board, GameStatus gameStatus){...}

    public void ShowGameOver(){...}
}
The BoardElement object appears again in the Display class where it is used in the ShowGameBoard method to facilitate the color formatting of the output.
The ShowGameDisplay method is called by PlayGame in the Engine class. It is used to update the display in response to changes in the game state. If the paramater showGameResult is false, the game result panel is not shown.
The methodsShowMainMenuWithTitle, ShowRestartMenuWithTitle, and ShowLevelMenuWithTitle are used to display the different game menus in conjunction with the game’s title screen.
The ShowGameOver method displays the game over screen, and is called when the user opts to end the game after winning or losing.
Engine
The Engine class is where everything comes together and gameplay happens. As previously seen, the game can be run by simply instantiating an Engine object, and then using this object to call Run.
1
2
3
4
5
6
7
8
9
10
11
12
13
14
15
16
17
18
19
20
public class Engine
{
    private (int x, int y) cell;
    private Board? gameBoard;
    private GameLevel gameLevel;

    private Display? gameDisplay;
    private MainMenuOption menuOption;
    private RestartMenuOption restartOption;

    public Engine(){...}

    public void Run(){...}

    private void PlayGame(){...}

    private void SetGameLevel(){...}

    private (int, int) GetCellCoordinates(){...}
}
The GetCellCoordinates method is used get the input from the player in the form of coordinates. Provided that the input is valid, the method returns a tuple containing valid (x, y) coordinates. It throws an exception otherwise.
The SetGameLevel method displays the game level selection menu to the player and saves their selection for use by the PlayGame method.
The Runmethod is quite simple. It gets the option selected from the main menu and based on that selection, it either starts the game, allows the player to select the game level, or exits the game. It makes calls to the PlayGame and SetGameLevel methods.
1
2
3
4
5
6
7
8
9
10
11
12
13
14
15
16
17
18
19
20
21
22
23
24
public void Run()
{
  bool continueGame = true;

  while (continueGame)
  {
    menuOption = gameDisplay.ShowMainMenuWithTitle();

    switch (menuOption)
    {
        case MainMenuOption.StartGame:
            PlayGame();
            break;
        case MainMenuOption.SelectLevel:
            SetGameLevel();
            break;
        case MainMenuOption.ExitGame:
            continueGame = false;
            break;
        default:
            break;
    }
  }
}
The PlayGame method houses the game loop. Here, user input is solicited and processed, and the game display is updated accordingly. If the game state changes from being in progress, the game result screen is displayed, followed by a restart game menu prompt.
1
2
3
4
5
6
7
8
9
10
11
12
13
14
15
16
17
18
19
20
21
22
23
24
25
26
27
28
29
30
31
32
33
34
35
36
37
38
39
40
41
42
43
44
45
46
47
48
49
50
51
52
53
54
55
56
57
private void PlayGame()
{
  GameStatus gameStatus = GameStatus.InProgress;
  gameBoard = new Board(gameLevel);
  bool validInput;

  while (gameStatus == GameStatus.InProgress)
  {
    gameDisplay.ShowGameDisplay(gameBoard, gameLevel, gameStatus, false);

    try
    {
      cell = GetCellCoordinates();
      validInput = gameBoard.IsCellOutOfBounds(cell) ? false : true;
    }
    catch
    {
        validInput = false;
    }

    if (validInput)
    {
      gameStatus = gameBoard.IsCellBomb(cell) ? GameStatus.Loss : GameStatus.InProgress;

      if (gameStatus == GameStatus.InProgress)
      {
        gameBoard.UpdateBoard(cell);
        gameStatus = gameBoard.IsGameWon() ? GameStatus.Won : GameStatus.InProgress;
      }

      if (gameStatus != GameStatus.InProgress)
      {
        gameDisplay.ShowGameDisplay(gameBoard, gameLevel, gameStatus, true);

        Console.ReadKey();
        restartOption = gameDisplay.ShowRestartMenuWithTitle();

        switch (restartOption)
        {
          case RestartMenuOption.Continue:
              gameStatus = GameStatus.InProgress;
              gameBoard.ResetBoard(gameLevel);
              break;
          case RestartMenuOption.GoToMainMenu:
              gameStatus = GameStatus.Restart;
              break;
          case RestartMenuOption.ExitGame:
              gameDisplay.ShowGameOver();
              Environment.Exit(0);
              break;
          default:
              break;
        }
      }
    }
  }
}
Some Thoughts on the Results
Upon reviewing the project code, I think that the modeling of the game entities and certain design elements can be improved somewhat, but the juice isn’t worth the squeeze given the small size of the project. The game is playable, and can provide a few moments of amusement.
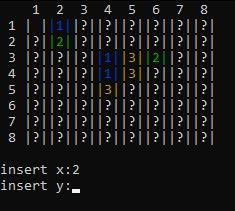
 Playing the refactored version of Minesweeper
One problem I encountered was the misalignment of the numbers which labelled the columns. This occurred when I attempted to make the gameboard larger than 10x10. It wasn’t possible to center them without doing a complete redesign of the gameboard. This little issue is why I didn’t make the gameboards larger in the refactor. Larger boards with more bombs could add to the game, and would definitely be more of a challenge for seasoned players.
The most enjoyable part of this project was exploring and learning how to use the functionality contained in the Spectre.Console library, and solving the problems presented along the way by applying these newly discovered methods. It brought me great pleasure to be able to make a bland looking console application into something a bit more colourful and easier to play. It reminded of me of my Linux days, and my fleeting explorations of the ncurses library. Spectre.Console is nowhere near the level of an ncurses implementation, but I will concede that it does what it says on the tin and lives up to its promise of making it easier to make beautiful console applications.
   |