Building Battleship - Part I
Building a graphically interactive console game using the Spectre.Console library.
As my last project to refactor and improve a console version of Minesweeper was winding down, my mind wandered to thoughts of what’s next, and I had the idea of trying my hand at a Battleship game. I fortuitously came across a series of blog posts outlining the modeling of this game in C#. I worked through the series to see how the game could be modeled, and decided to build a version of Battleship based on the models from this series.
A Bit of Background
The final result of the aforementioned series presented the game as a simulation between two computer players named Amy and Vince. No human input except for the number of games to be played was required. The program would start by asking the user how many games they wanted to play, and then proceed to run the number of games.
 First and only prompt for input
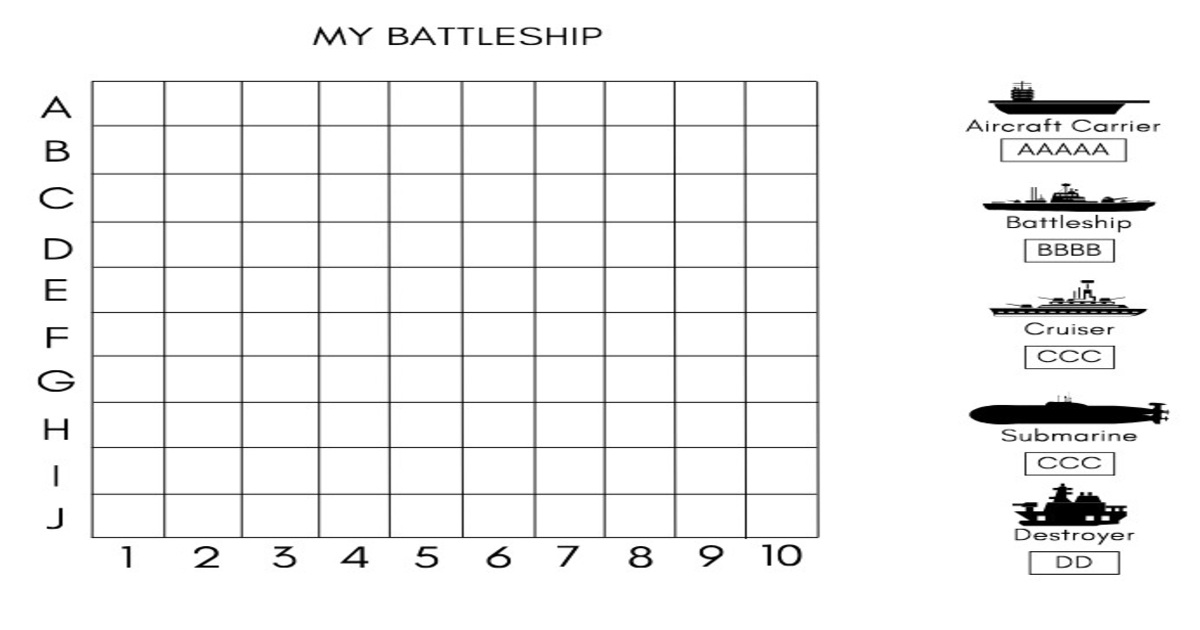
At the start of each game, player and firing boards were displayed for each player with the player board showing the ships as they were placed.
 Game and firing boards at the beginning of the game
The first thing which struck me about this was how difficult it was to properly pick out where the ships were placed on the players’ game boards. Some contrast was needed. Spectre.Console, the new toy I’m playing with, first came to mind as a possible fix for this issue. But the ForegroundColor and BackgroundColor properties of the Console class could also be modified to give the much needed colour for contrast.
After displaying the boards, lines of texts showing each player’s shots and the results of those shots were output until one player emerged victorious by sinking all of their opponents ships.
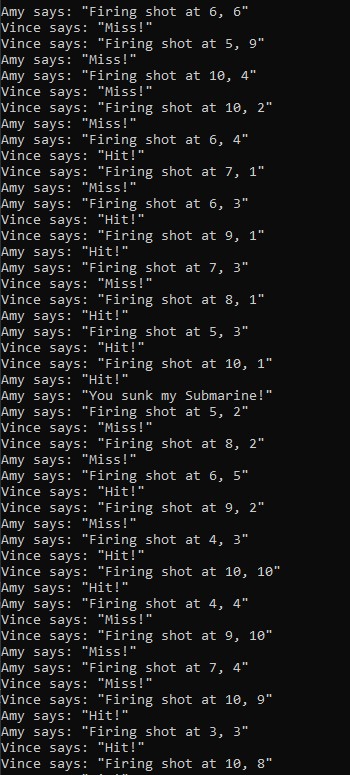 Fired shots and results
Win-loss statistics for each player were displayed after all of the games were completed.
![]() Win loss stats for 20 simulated games
Win loss stats for 20 simulated games
Motivations
The models developed in the series provided a bare bones look at Battleship, and I had the desire to develop it into a fully playable, interactive console game using the Spectre.Console library. I thought it would be a great way to learn more about Spectre.Console while developing a console version of a classic, tabletop game.
My goals for this console version of Battleship built based on these models were to:
- make the game fully playable by a human player against a computer opponent by using the keyboard for input
- make the game and firing boards visually unambiguous with clear differences between the ships and the rest of the board
- allow the player to manually place and position ships while also retaining the option of random ship placement
- retain the shots fired and results information from the original simulation
- have in-game documention of keyboard controls
- display targeting information (coordinates) as the player moved the crosshairs to target ships
- display ship status information showing which ships had been sunk and the number of hits remaining
- make the game interface aesthetically pleasing by using the layouts, panels, markup, and live display functionality of the Spectre.Console library
These are seemingly simple and straightforward goals, but I did encounter some challenges as I worked my way through them. The remainder of this post as well as the next deals with the process I went through to develop the game.
The Mise En Place
The first thing I did before making changes to the models in order to build my version of Battleship was to read every line of code in the original project in order to fully understand how everything was working and how it all fit together. I’ve found that understanding the original code before making modifications helps to reduce the amount of bugs accidentally introduced when changes are made.
The next thing I did was to work through the Spectre.Console examples to see how the functionality I wanted to add to the game could be implemented. I spent a bit of time experimenting with the LiveDisplay example in order to work out how to use keystrokes with the LiveDisplay widget. I also made myself more familiar with the Layout and Panel widgets since I’d decided to make these widgets an integral part of the graphics system for the game.
I did experiments using Layout/Panel widgets and Markup to display game board grids and to flesh out preliminary layout designs. These experiments were my way of finding out if the ideas I had about how the game should look could work.
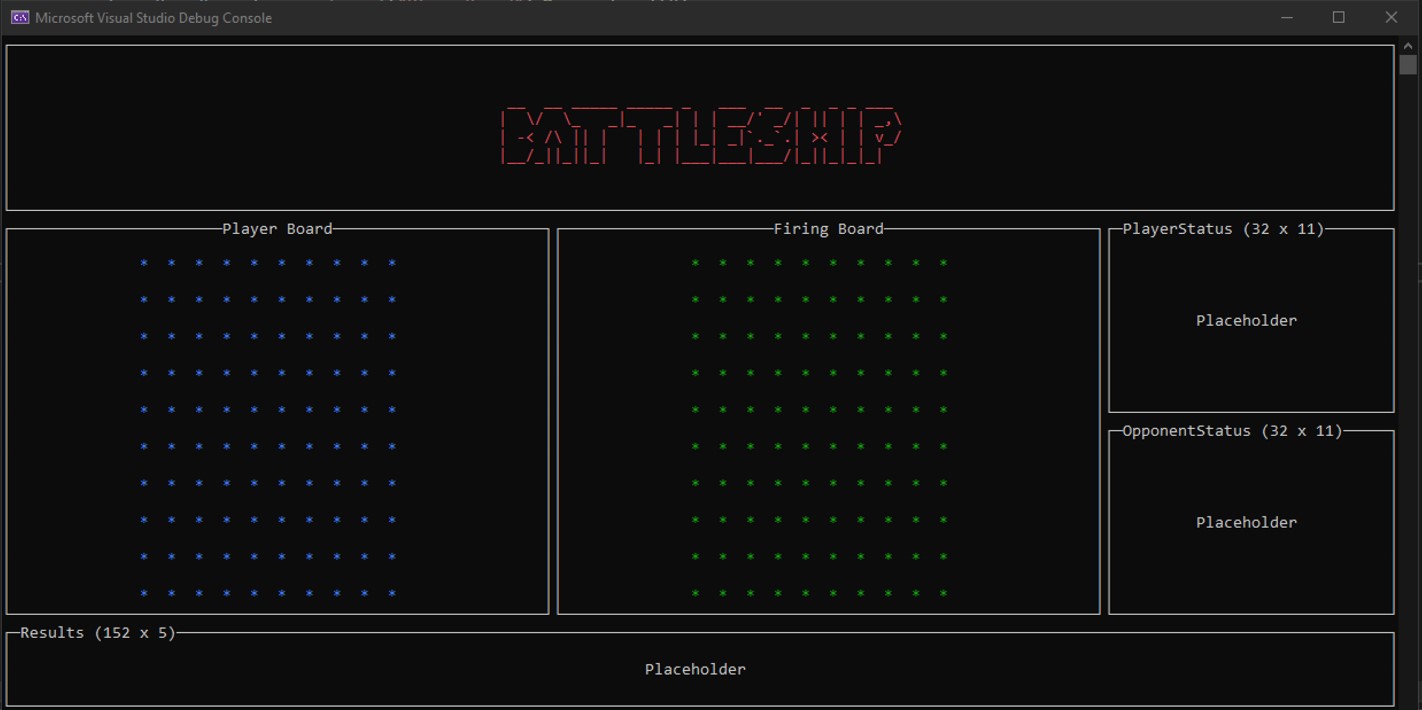 One of my early experimental layout designs
The Layouts
After fruitfully experimenting with the relevant Spectre.Console components, I designed the final layouts and worked out how they would interact with each other. Even though I dedicated time to designing the layouts, this process wasn’t a one time thing. The layouts had to be coded, and so they evolved over time as I learnt the limits and quirks of the Spectre.Console library.
I initially started with 4 main layouts, but ended up reducing it to just three:
- Start Screen
- Ship Placement
- Game Board
The fourth layout which didn’t make the cut was the ‘Demo Board’ layout. The idea behind this was to have the game play itself for a few rounds, but I decided against it due to time constraints and because I didn’t think it would add much to the game.
I also created a layout for the game title which was displayed whenever any other layout was visible. The ASCII art for the game was created using this ASCII art generator.
Start Screen Layout
The start screen layout is the first layout shown when the game starts. It is also shown if the user for some reason decides to access it once a game is in progress. It comprises four smaller layouts containing the left and right border panels, the main menu panel, and the footer panel. These layouts, except for the layout containing the footer panel layout, are grouped together within a ‘container’ layout which allows them to be manipulated together as needed.
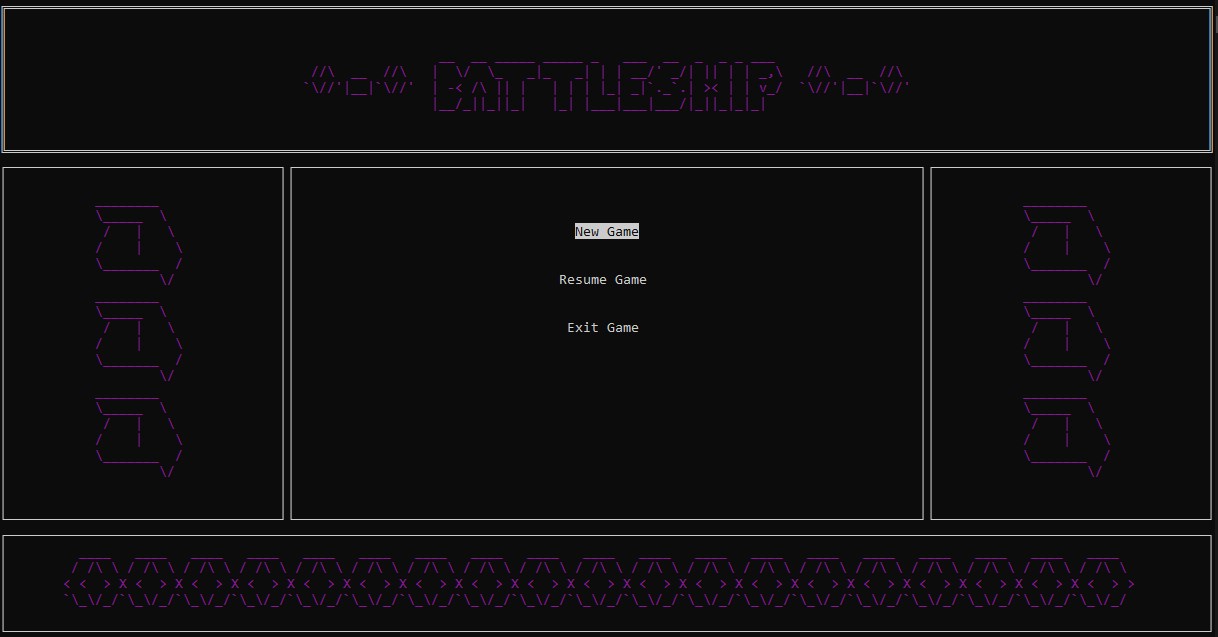 Start screen
Ship Placement Layout
The ship placement layout is displayed once a new game has been started. Its purpose is to allow the user to place and position ships before starting an actual game. It consists of four layouts containing the player board, ship selection menu, ship placement updates, and keyboard tips. The ship placement updates and keyboard tips layouts are grouped together within another ‘container’ layout.
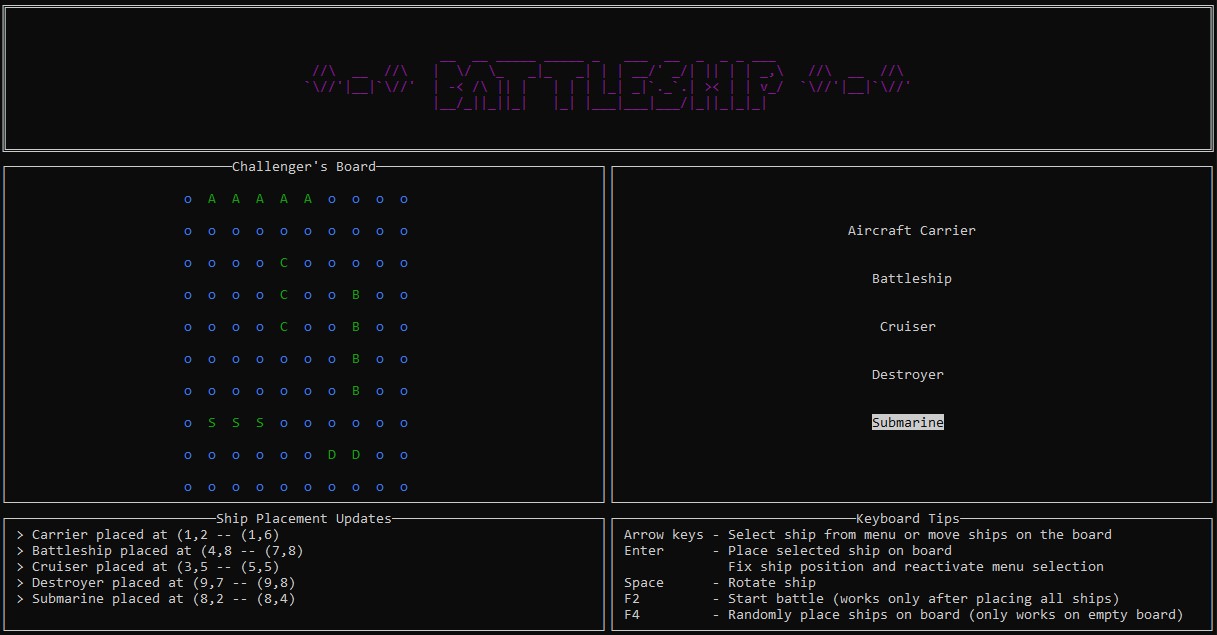 Ship placement layout
Game Board Layout
The game board layout is shown once the game has been started. A lot of information is shown in this layout, and it it where all of the game action happens. It contains the most layouts of all the main layouts with a total of 9. There are two ‘container’ layouts and 7 visible layouts:
- player board
- firing board
- ship statuses for player 1 (the human player referred to as ‘The Challenger’)
- ship statuses for player 2 (the computer player referred to as ‘General Supreme’)
- battle updates
- keyboard tips
- targeting dashboard
The ship status layouts along with the battle updates and keyboard tips layouts are nested within their own ‘container’ layouts.
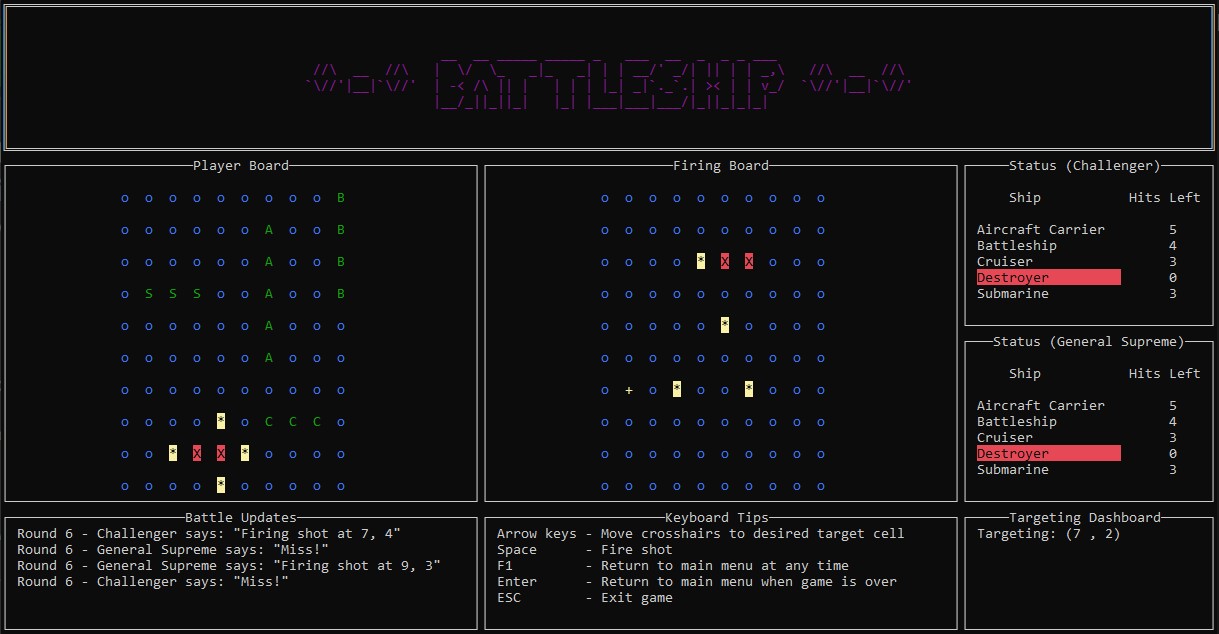 Game board layout
I realise that showing the number of hits left for each ship makes the game less challenging, but I left this in because I wanted to experiment with displaying information using a combination of Markup and Panel/Layout objects.
The Menu Class
In order to have a menu which could be nested within a panel and positioned freely, I had to create one because I discovered that it wasn’t possible to nest a Selection or MultiSelection prompt within a panel. This led to the creation of the MenuItem and Menu classes.
The MenuItem class is used to store information for a single menu item, and facilitate menu functionality by returning the menu item name with markup applied if the item is currently selected.
1
2
3
4
5
6
7
8
9
10
11
12
13
14
15
16
17
18
19
20
21
22
internal class MenuItem
{
  public string ItemName {get; set;}
  public bool IsSelected { get; set;}

  public MenuItem(string itemName, bool selectedStatus)
  {
      ItemName = itemName;
      IsSelected = selectedStatus;
  }

  public string GetNameWithMarkup()
  {
      string nameWithMarkup = ItemName;

      if (IsSelected)
      {
          nameWithMarkup = "[invert]" + ItemName + "[/]";
      }
      return nameWithMarkup;
  }
}
The Menu class is composed of a list of MenuItem objects. These menu items can be selected using the SelectNextItem and SelectPreviousItem methods. When the menu needs to be displayed it can be returned as a Panel object using the method GetMenuAsPanel.
A snippet of code from the Menu class showing the aforementioned methods and class constructor is shown below.
1
2
3
4
5
6
7
8
9
10
11
12
13
14
15
16
17
18
19
20
21
22
23
24
25
26
27
28
29
30
31
32
33
34
35
36
37
38
39
40
41
42
43
44
45
46
47
48
49
50
51
52
53
54
internal class Menu
{
  private List<MenuItem> menuItemList;

  private int CurrentItemIndex { get; set; }
  public string SelectedItemName{...}

  public Menu(string[] menuItems)
  {
    menuItemList = new List<MenuItem>();

    foreach (var item in menuItems)
    {
        MenuItem menuItem = new MenuItem(item, false);
        menuItemList.Add(menuItem);
    }

    SetFirstItemAsSelected();
  }

  public void SelectNextItem()
  {
    int nextSelection = CurrentItemIndex + 1;
    int maxSelection = menuItemList.Count - 1;

    if (nextSelection <= maxSelection)
    {
        menuItemList[CurrentItemIndex].IsSelected = false;
        CurrentItemIndex++;
        menuItemList[CurrentItemIndex].IsSelected = true;
    }
  }

  public void SelectPreviousItem()
  {
    int nextSelection = CurrentItemIndex -1;
    int minSelection = 0;

    if (nextSelection >= minSelection)
    {
        menuItemList[CurrentItemIndex].IsSelected = false;
        CurrentItemIndex--;
        menuItemList[CurrentItemIndex].IsSelected = true;
    }
  }

  public Panel GetMenuAsPanel()
  {
      var menuText = new Markup(CreateMenuMarkup()).Centered();
      var menuPanel = new Panel(menuText).Expand().Header("").HeaderAlignment(Justify.Center);

      return menuPanel;
    }
}
The Menu class can been seen in operation when the main menu for the start screen is used or when ships are selected for positioning on the ship placement screen. The following code snippet from the GameDisplay class shows how the Menu class was used to create the menu layout contained in the start screen layout.
1
2
3
4
5
6
7
8
9
10
11
12
13
14
15
16
17
18
19
public partial class GameDisplay
{

  private Menu mainMenu;
  private Menu shipMenu;

  private void CreateMenus()
  {
      mainMenu = new Menu(MenuItemLists.MainMenuItems);
      shipMenu = new Menu(MenuItemLists.ShipMenuItems);
  }

  private Layout CreateMainMenuLayout()
  {
      var menuLayout = new Layout("MainMenu").MinimumSize(80);
      menuLayout.Update(mainMenu.GetMenuAsPanel());
      return menuLayout;
  }
}
The menu item names supplied to the Menu class constructor came from the class MenuItemLists. This was a small class I created just for the purpose of storing and returning the ship and main menu items as string arrays. The code for this class is shown below.
1
2
3
4
5
6
7
8
9
10
11
12
13
14
15
16
17
18
19
20
21
22
23
24
25
26
27
28
29
30
31
32
33
34
public class MenuItemLists
{
    private static readonly string[] mainMenu =
    {
        "New Game",
        "Resume Game",
        "Exit Game"
    };

    private static readonly string[] shipMenu =
    {
        "Aircraft Carrier",
        "Battleship",
        "Cruiser",
        "Destroyer",
        "Submarine"
    };

    public static string[] MainMenuItems
    {
        get
        {
            return mainMenu;
        }
    }

    public static string[] ShipMenuItems
    {
        get
        {
            return shipMenu;
        }
    }
}
Game Display - The Dreaded ‘God’ Class
The GameDisplay class handles anything related to the graphics of the game i.e layouts, panels, and menus. Everything graphical in the game revolves around the LiveDisplay widget which allows the display to be updated without a perceptible refresh or screen scrolling. It also processes the keyboard inputs from the user, and functions as the game engine. All of these responsibilities unfortunately makes GameDisplay a ‘god’ class, and I ended up splitting it over 8 modules.
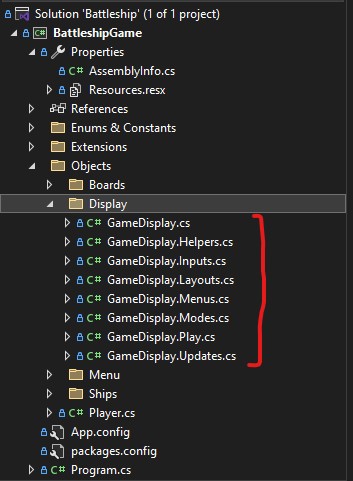 GameDisplay ‘god’ class
This class will definitely be one of the main targets for refactoring as time permits at some point in the future.
Conclusion
Because I was still learning what was possible and how it would all fit together as far as making a version of Battleship with Spectre.Console was concerned, I realised that I couldn’t determine which design patterns would be a good fit for the game until I had fleshed out a working version. So I decided to keep things simple and not try to complicate the process by introducing design patterns. These will be added during the refactor.
In part two of this post, I will discuss the changes made to the models in order to implement the manual ship placement feature, and also dig a little bit deeper into the inner workings of the GameDisplay class. In the meantime, the code for the project can be viewed here, and thank you for reading this far!
   |